I will not update this blog regularly from now on. All my future posts will either be on my Blogger site or, Github site:
Blogger Site Link:
https://quickgrid.blogspot.com
Index of all posts:
http://quickgrid.blogspot.com/p/archives.html
http://quickgrid.blogspot.com/p/archives.html
I have posted the part 1, 2, 3, 4 of the series. Part 1 is just an overview of the tools and where to get them and part 2 is making the app front end using bootstrap template, part 3 is deploying the web application to firebase hosting and using postman to perform http get requests, part 4 is adding javascript and jquery code to get data using a github api method, perform regular expressions to get urls with pdf extension from text data, using regex get pdf file names from url links and finally adding the names to sidebar.
The live web Application is here:
https://awesome-books.firebaseapp.com
Link to github repo:
https://github.com/quickgrid/QGrid-Github-API-Book-List-and-View-App
This tutorial covers all the tool and websites required to make this web project. Such as, postman, atom, firebase, github, nodejs, http-server, google developer console, regexr, bootstrap, mdn etc.
This tutorial covers Usage of chrome developer tools, bootstrap example download and configure, atom editor usage,
including external icon from fontawesome, input suggestions, creating list items and providing
link for click on anchor.
http://quickgrid.blogspot.com/p/archives.html
The site above list all the posts published automatically according to their date.
Tutorial on pulling json data from uhunt, parsing in c# and showing on universal windows phone app.
http://quickgrid.blogspot.com/2016/03/beginner-uhunt-api-usage-tutorial-for-windows-phone-8.1.html
http://quickgrid.blogspot.com/2016/03/bash-shell-script-calculate-factorial.html
One way to resize is to go to avd manager then click on pen icon to edit. Now change the scale settings based on screen resolution. Android studio use to have emulator configuration options in which I could pass arguments such as “-scale 0.8” to scale the emulator. But as of this writing Android studio no longer has that option. Another option is to connect via telnet and pass commands to it. Also more options are available read this.
First go to programs and features then select Telnet Client and Server then apply. Now open command prompt and type “telnet localhost 5554” if it is the first instance of the emulator. Increment by two for the next one and so on if multiple instances are running.
Type telent commands carefully. After making typo in command then fixing by backspace and insert doesn’t work. Just press enter and reenter the commands.

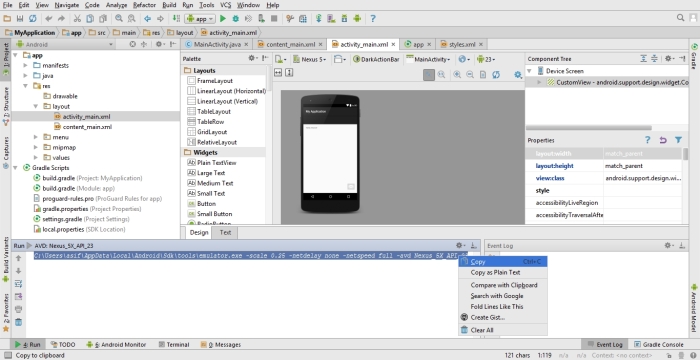
For using terminal and command prompt to run and scale the emulator the easiest thing to do is first do a run using the play button. No need to wait for the emulator to load. Just note the emulator path with its arguments in the run tab bottom of the screen.
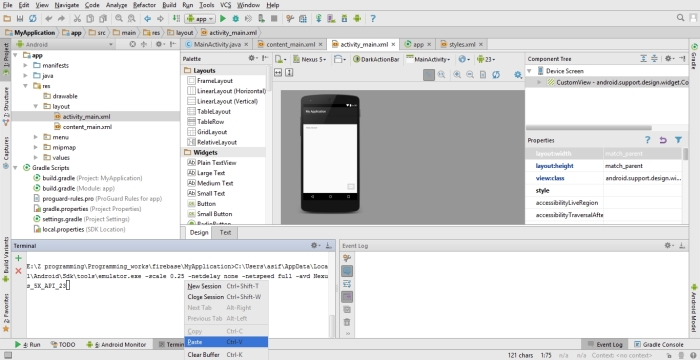
Copy the whole command and go to terminal tab on android studio. Now paste it in terminal and change the scale factor.
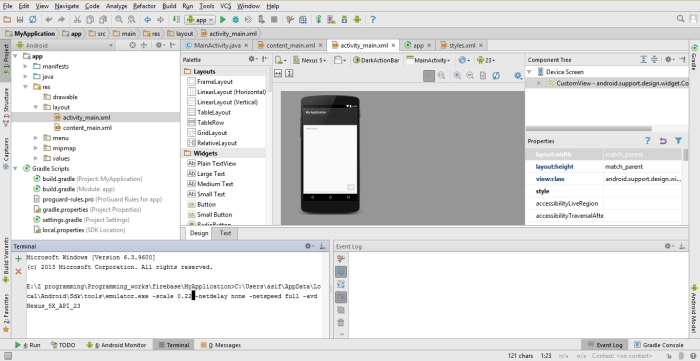
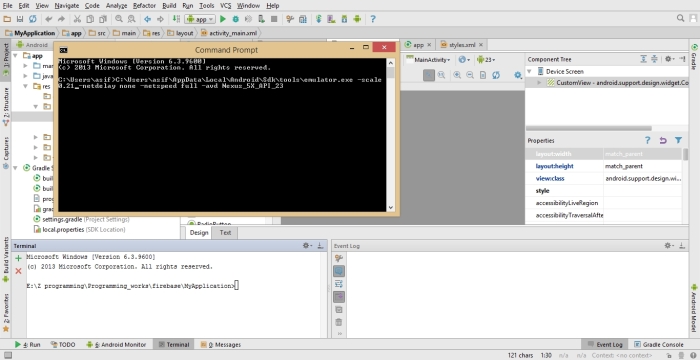
Just open command prompt and paste in the same command copied as above. Then just change the scale part to best suit your screen resolution.
Read using the Emulator Console Part.
http://developer.android.com/tools/devices/emulator.html
Say you have a c file “helloworld.c”. It contains header such as “stdio.h”, “stdlib.h”, but unable to compile with gcc. In order to solve it run this command on terminal,
sudo apt-get update && sudo apt-get --reinstall install libc6-dev
If it asks to [Y/n] press Y and continue installation. After installation is complete it should be able to compile properly.

Now just follow code shown above to run your code from terminal.
This tutorial is for Android studio. Also I am assuming that no sdk’s are installed prior to this. Although it would work if there are previous sdk’s. Use this tutorial only if the built in sdk manager or the standalone sdk manager is unable to download for some reason ( Sudden internet disconnection and the hassle of restarting from beginning ).
The system images can be downloaded either going to Intel’s website or making a note of the google cdn download address shown in the sdk manager.
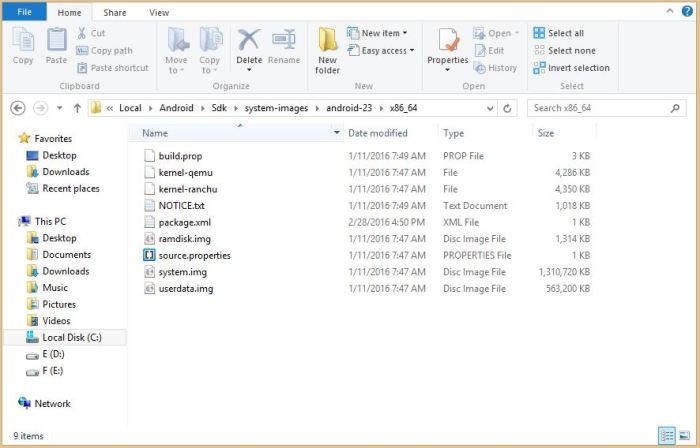
After downloading the system image which should be named something like “sysimg_x86_64-23_r08.zip”. Go to the android sdk folder. If there isn’t a directory called “system-images” then make one. Next inside that folder create a new directory called “android-23” ( for android 6 marshmallow ). Inside this folder create a directory named “x86_64”. Inside this folder extract all the contents of the downloaded zip file.
Now start the android studio and go open sdk manager from setting. It should now recognize the new sdk. In case no other sdk’s are installed it may show that it needs download additional components. Just disconnect internet and click next. It should now recognize the sdk and click finish.
https://www.microsoft.com/en-us/store/games/air-shifter/9wzdncrdjzx3
http://quickgrid.github.io/AirShifter/
https://github.com/quickgrid/AirShifter
I have provided some guidelines on project site. Rest I will comeback later and edit this post.
About a few months ago I had to format my whole hard disk. I thought I had lost all my source code, but found it in backup a few days ago.
The game is a lot similar to flappy bird with some nice graphics. I am now trying to remove all my personal and store related information from the project, so that I can upload it to github. There are lot of opportunity to improve it.
I haven’t used any game engines or anything complex. Just basic logic and image manipulation. It should be helpful to beginners.
Here’s the link to the game. It is free to download and doesn’t have ads.
https://www.microsoft.com/en-us/store/games/air-shifter/9wzdncrdjzx3

This is tutorial is in Bangla language.
The problem here is that some versions of linux mint Cinnamon such as 17, 17.3 aren’t able to run without software rendering inside virtual box. In some cases even the live dvd won’t work without running in software rendering mode. Also for linux 17.3 with virtualbox 5.0.14 isn’t even able to run the OS GUI. It fails showing a message like, “x server failed” and switches to command line version.
Note that I can’t guarantee this solution will not work in your system but give it a try if there are no other options. The problem seems to be with linux mint 17 Cinnamon series and virtual box 5. Other free virtualization software such as VMWARE player works will work in case you need to use mint but, advanced feature such as screen recording may not be freely available.

4. Next start the virtual machine and from the machine install linux mint with default settings.
5. The vmware player should show notifications for installing vmware tools. First download the tools by clicking option in the notification. Then follow this tutorial to install vmware tools from terminal. Do this after installing mint on the virtual hard drive and not on the live dvd.
6. Now you should able to run linux mint fast and full screen in vmware player but if you still need virtual box then follow next steps.
7. Now inside virtual box click new and then click on expert mode to get the window shown below. From there follow all the necessary settings required for setting a virtual machine in virtual box. The only change is use an existing hard drive and select the vmdk machine created by vmware player. Typically located in document -> virtual machines folder.

8. If all the steps are followed correctly now you should have a fully working linux mint 17 virtual machine in virtual box. It should run the non software rendering version of cinnamon and support full screen workflow.
9. For the last step you may choose to install virtualbox guest additions. It will show a warning about replacing previously installed software without removing them properly might cause instability. I disregarded the message and installed anyway and It seems to be working for the moment.

You must be logged in to post a comment.